<?xml version="1.0" encoding="ISO-8859-1"?><!-- "@(#) $Header: /userland/cvs/pci_site/src/documentation/content/xdocs/patients/contribute.xml,v 1.16 2007/11/20 18:03:45 dclunie Exp $" --><!--
  Copyright PCIR 2007. All rights reserved.
--><!DOCTYPE document PUBLIC "-//APACHE//DTD Documentation V1.3//EN" "document-v13.dtd">
<document xmlns:xi="http://www.w3.org/2001/XInclude">
  <header>
    <title>Contribute Images</title>
  </header>
  <body>
    <section id="begin">
      <title>Begin.</title>
      <p>
		From this page you will be able to begin uploading your images and related information.
		Before uploading you should read at least the <strong><link href="site:patient_agreement">agreement</link></strong> and brief instructions. To begin uploading immediately, click once <link href="perform_upload.html"><strong>HERE</strong></link>.
      </p>
    </section>
    <section id="briefinstructions">
      <title>Brief instructions for uploading entire CDs or scanned document files.</title>
	  <p>
	  These brief instructions may suffice; click <link href="site:instructions">here for more detailed general instructions</link>, and <link href="site:uploadingcd">here for illustrated instructions for CD uploading</link>.
	  </p>
	  <ol>
		<li>Go to the <link href="perform_upload.html"><strong>upload page</strong></link>.</li>
		<li>Agree to trust the applet (and check "always trust", if you don't want to be asked again next time).</li>
		<li>Agree to the terms and conditions.</li>
		<li>Optionally, click "Enter Reason" to select the reason the imaging test was performed.</li>
		<li>Perform the upload
			<ul>
			<li>to upload the entire contents of your CD of images, click "Upload Disk", or</li>
			<li>to upload selected scanned documents, click "Upload Files".</li>
			</ul>
		</li>
		<li>Select the CD drive or files in the dialog box that appears.</li>
		<li>Wait for the transfer to complete.</li>
		<li>Repeat the previous steps as necessary to upload more material.</li>
	  </ol>
	  <p>
	  You don't have to upload everything at once; you can come back another time, for example, to upload scanned documents that you may receive later.
	  </p>
    </section>
    <section id="instructions">
      <title>Instructions.</title>
      <p>
		We suggest that you read and understand (and if you like, print out for reference)
		these instructions before beginning.
      </p>
      <p>
        If you have any question about what type of images we need, how to obtain them, and
		how to also contribute accompanying information like reports, please read the
		section on <link href="site:what_we_need">what we need, by clicking once here</link>.
      </p>
      <p>
        First gather together the images and information that you will be uploading. These instructions
		assume that you have your images on a CD, and that optionally you have a few pages of printed
		text (such as radiology and pathology reports) that you have already scanned into your
		computer. The upload process is the same in either case - you just need to be able to "find"
		where the files live on your computer.
      </p>
      <p>
        You upload one CD or set of scanned paper files at a time; that is, if you have several CDs (e.g., an old exam, and a
		new one), then one CD needs to be completely uploaded before you start the next one. This is
		to avoid running out of space on your hard drive by trying to process too much at once. If
		you have scanned paper documents, these files are also uploaded separately from the CDs. You
		can do this in any order, but since the paper files are generally fewer and smaller, we
		recommend that you do them first.
      </p>
      <p>
        The upload will begin by asking you to agree that you are contributing the images and information to the public domain for PCIR
		to distribute. It is important that you understand fully the terms of this <link href="site:patient_agreement">agreement</link> before you begin uploading, since once
		your images and information have been contributed, it is too late to change your mind. Please review the <link href="site:patient_agreement">agreement</link> by clicking once <link href="site:patient_agreement"><strong>HERE</strong></link> before
		proceeding. If you have any remaining concerns, you may also want to read or re-read the answers to the <link href="site:patient_faq">Frequently Asked Questions</link>.
		Do not proceed if you do not understand the <link href="site:patient_agreement">agreement</link>.
      </p>
	  <p>
	  The upload will proceed by using a <link href="site:sysreq_software_java">Java applet</link>, which is a small piece of software that will automatically be downloaded to your computer,
	  which will allow you to:
	  </p>
	  <ol>
		<li>Agree to the terms and conditions</li>
		<li>Optionally, select the reason the imaging test was performed.</li>
		<li>Select the drive or files to upload (e.g., the entire contents of your CD of images, or selected scanned document files)</li>
		<li>Compress and securely encrypt the selected files</li>
		<li>Transfer the encrypted files to the PCIR</li>
	  </ol>
	  <p>
	  When the applet starts, since it needs access to both the files on your local computer that you are going to upload and the network
	  to transfer them, you will be asked if you "trust" the certificate that was used to "sign" the applet; you must select "trust" in
	  order to proceed. See the FAQ section on <link href="site:sysreq_software_javatrust">trusting Java</link> for more details.
	  </p>
	  <p>
	  The most time-consuming step, depending on the speed of your connection, will be the final step, the transfer, and it
	  is recommended that you leave this to finish over night or at some other time when you do not need to use your computer
	  or your Internet connection. Be sure not to log off, put to sleep or turn off your computer
	  until the transfer is complete, of course.
	  </p>
	  <p>
	  If you have any concerns over what your computer needs to be capable of, please read the <link href="site:patient_faq_sysreq">System Requirements FAQ</link>.
	  </p>
    </section>
    <section id="uploadingcd">
      <title>Detailed instructions for uploading entire CDs.</title>
	  <p>
	  The following instructions mostly use illustrations from Windows machines, but the instructions are equally applicable to
	  all platforms, except where specifically noted, since the Java applet behaves the same way.
	  </p>
	  <p>
	  If you have obtained you images on a CD, as is usually the case, then we would like you to transfer the entire CD contents.
	  </p>
	  <p>
	  First, go to the <link href="perform_upload.html"><strong>upload page</strong></link> and wait for the Java applet
	  to start (which might take a few moments, so you need to be patient).
	  </p>
	<section id="uploadingcd_agree">
	  <title>Agree to terms and conditions</title>
	  <p>
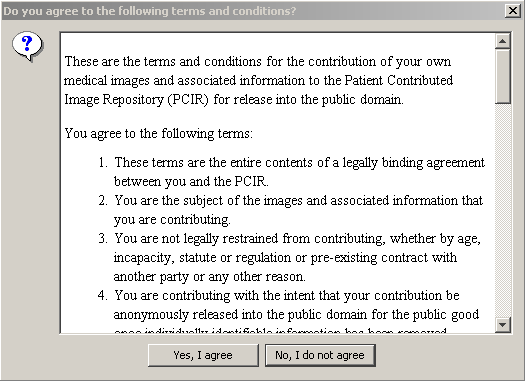
	  Agree to trust the applet and agree
	  to the terms and conditions. You will see the following dialog, and must click on "Yes, I agree" in order to
	  proceed:
	  </p>
	  <p>
	    <img src="images/doyouagree.png" alt="agreement dialog"/>
	  </p>
	</section>
	<section id="uploadingcd_enterreason">
	  <title>Enter reason</title>
	  <p>
	  At this point, it would be highly desirable for you to enter the reason the imaging test (exam) was performed, which may
	  be a diagnosis or some other condition, by clicking once on the button labeled "Enter Reason". This step is optional, however,
	  and you may proceed directly to <link href="#uploadingcd_uploaddisk">uploading the disk</link>, if you prefer.
	  </p>
	  <p>
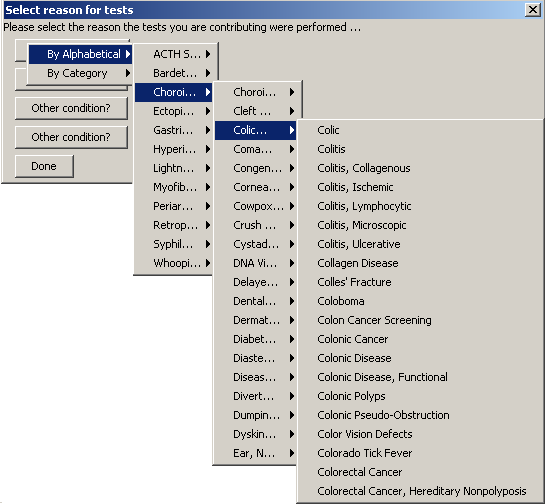
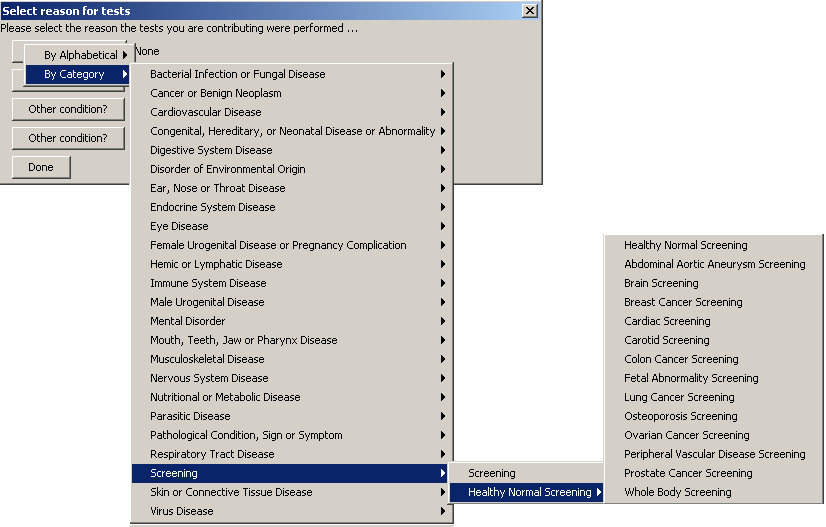
	  If you do elect to enter a reason, you can do so either by category, or alphabetically, as shown here:
	  </p>
	  <p>
	    <img src="images/enterreasonbycategory.png" alt="enter reason by category"/>
	  </p>
	  <p>
	    <img src="images/enterreasonbyalpha.png" alt="enter reason by category"/>
	  </p>
	</section>
	<section id="uploadingcd_uploaddisk">
	  <title>Upload disk</title>
	  <p>
	  Next, click once on the button labeled "Upload Disk" as shown here:
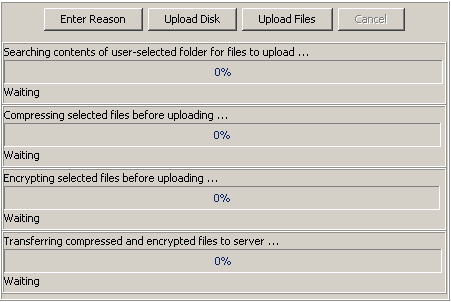
	  </p>
	  <p>
	    <img src="images/uploaddiskbutton.png" alt="applet with upload disk button highlighted"/>
	  </p>
	  <p>
	  A dialog box will pop up asking you to select the drive containing the CD. It will start out showing
	  the contents of the folders where your drives live ("My Computer" on Windows, and "/Volumes" on the Mac).
	  Click once on the drive to select it. Note that the actual name shown will be the name written on the CD, and this varies
	  between manufacturers and sites (it might be "CDROM" or it might be your name or ID number or
	  similar). On Windows it will look something like this after you have clicked on the CD drive
	  (the text "D:\" will appear in the File name box).
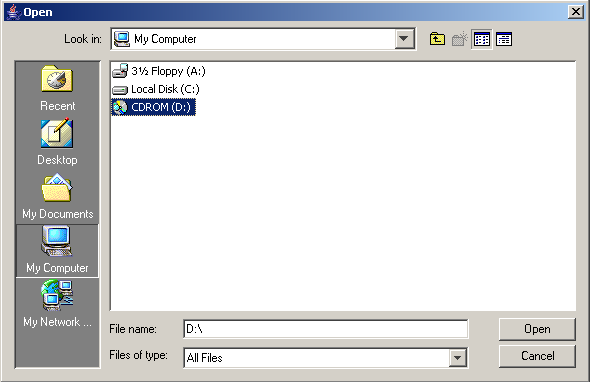
	  </p>
	  <p>
	    <img src="images/windowsdiskselectiondialog.png" alt="windows disk selection dialog"/>
	  </p>
	  <p>
	  On a Mac, the dialog looks a bit different, and provides a list of mounted "volumes"; choose the
	  on that has an icon that looks like a CD, not the ones that look like little hard drives (
	  named things like "Macintosh HD") or folders (that is your home directory).
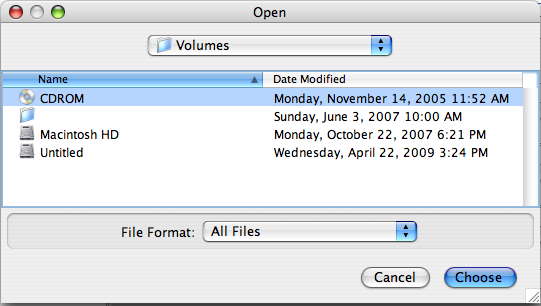
	  </p>
	  <p>
	    <img src="images/macdiskselectiondialog.png" alt="mac disk selection dialog"/>
	  </p>
	  <p>
	  Now you are ready to begin. On Windows, having selected the CD drive, click once on the "Open" button; on
	  the Mac, click once on the "Choose" button.
	  </p>
	  <p>The process of finding all the files on the disk, packaging and compressing them, encrypting them,
	  and transferring them will start immediately. The transfer step usually takes the longest. There is
	  sometimes a slight pause after finishing the encryption step and before beginning the transfer step
	  caused by the delay taken to establish a connection; just be patient. The following screenshot shows
	  a transfer in progress:
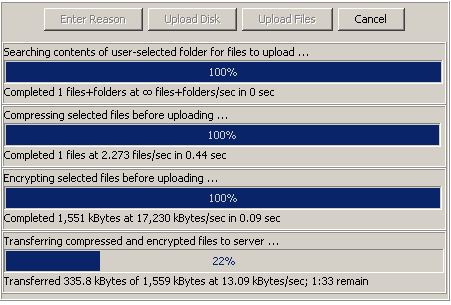
	  </p>
	  <p>
	  <img src="images/windowstransferprogress.png" alt="transfer in progress"/>
	  </p>
	  <p>
	  <strong>Do not do anything like close the web page, exit the browser,
	  log off, put to sleep or shutdown your computer, or disconnect it from the network, during the
	  transfer.</strong>
	  </p>
	  <p>
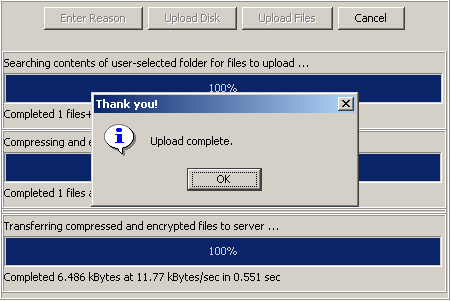
	  When the transfer is complete, the last line will say "Completed", and a success dialog will pop up, like this:
	  </p>
	  <p>
	  <img src="images/completedtransfer.png" alt="transfer in progress"/>
	  </p>
	  <p>
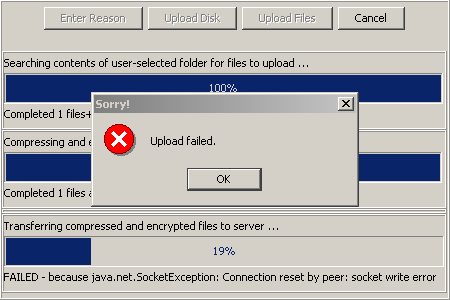
	  If an error occurs during transfer, it will look something like this:
	  </p>
	  <p>
	  <img src="images/failednetworkdisconnected.png" alt="transfer in progress"/>
	  </p>
	  <p>
	  There is no way to resume or recover from an error; you need to start again from the first step,
	  once you have corrected the cause of the error. More information can be found in the FAQ section on
	  <link href="site:TroubleshootingUpload">troubleshooting</link>.
	  </p>
	  <p>
	  If you change your mind at any step in the process prior to completion of the transfer, you
	  can click once on the Cancel button, and the process will be terminated.
	  </p>
	  <p>
	  Once the transfer has completed, you can upload more. If you have another CD to send, for example
	  if your exam is so large that it spanned multiple CDs, or if you want to upload an old examination,
	  or an examination from another facility, just click once on the button labeled "Upload Disk" again.
	  Note that you can only perform once transfer at a time. You have to wait for one to completely
	  finished before starting another.
	  </p>
	  <p>
	  Or, if you have additional files to send, like scanned documents stored as files, then you
	  can proceed to the using the "Upload Files" button, as described in the <link href="#uploadingscanneddocuments">next section</link>. 
	  </p>
      <p>
		If you are satisfied that you understand these <link href="site:uploadingcd">instructions</link> and
		have read and understood the <link href="site:patient_agreement">agreement</link>, and have your CD
		ready to load, begin uploading by clicking once <link href="perform_upload.html"><strong>HERE</strong></link>.
      </p>
	</section>
    </section>
    <section id="uploadingscanneddocuments">
      <title>Detailed instructions for uploading scanned documents.</title>
	  <p>
		Uploading scanned document files is just like uploading,
		CDs, except that you have to navigate to where you have stored the scanned documents on your computer, and
		if there is more than one file, select multiple files.
	  </p>
	  <p>
		Suppose that you are scanning reports using your own document scanner. Follow the instructions
		for your scanning software and store the scanned documents as files. It doesn't matter where you store them,
		or what you name them, but let's suppose that you have stored them directly into your "My Documents"
		folder, and that you have named the files by date of examination and page number. More details about
		how to scan paper documents are found in the section on <link href="site:sysreq_paperscanner">paper scanners</link>
		in the system requirements FAQ.
	  </p>
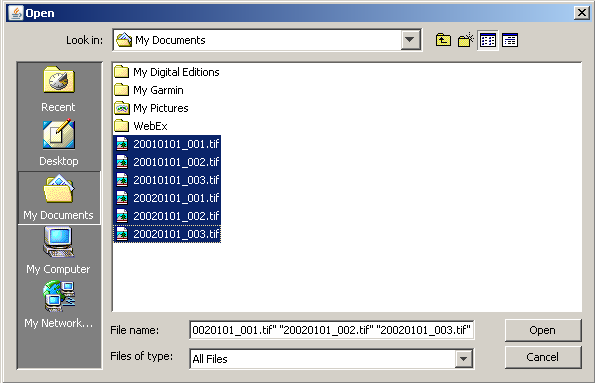
	  <p>
		Proceed as described for scanning CDs, except click on the Upload Files rather than Upload Disk button.
		A dialog that looks something like the following will appear; by default it opens in the "My Documents"
		folder on Windows, or your home directory on the Mac. In this dialog you can select multiple files by
		holding the shift key down whilst making your selection with the mouse. The selected files
		will be highlighted:
	  </p>
	  <p>
	  <img src="images/windowsfileselectiondialog.png" alt="choose files on windows"/>
	  </p>
	  <p>
		When you click open, the upload process will proceed in exactly the same manner as described for
		uploading CDs. You can select entire directories instead of files to upload if you want to.
	  </p>
	  <p>
		To reiterate, it doesn't really matter what you name the scanned document files; the contents of each file will be used to
		determine what date they apply to, for example.
	  </p>
	  <p>
		If, instead of scanning your own documents, you are using an office service bureau, you may
		have your scanned documents on a CD or memory stick; in this case you will need to navigate to the
		appropriate drive or folder to upload the files; you can use either the Upload Disk to upload the
		entire CD or USB stick's contents, or navigate to the appropriate folder using the Upload Files
		button.
	  </p>
      <p>
		If you are satisfied that you understand these <link href="site:uploadingcd">instructions</link> and
		have read and understood the <link href="site:patient_agreement">agreement</link>, and have your scanned documents
		ready to load, begin uploading by clicking once <link href="perform_upload.html"><strong>HERE</strong></link>.
      </p>
    </section>
  </body>
</document>